Friday, August 28, 2009

Inspired by Shelli

Shelli who? Shelli Gardner of course, Stampin' Up's Cofounder and CEO. Now, I have never had the pleasure of meeting Shelli but I enjoy reading her blog and I am so inspired by what she has achieved.

Shelli has a creative challenge on her blog each month and this month she has come to my rescue with her challenge. I am helping at Foxolicious (a stamping and scrapping fun day) on the 17th of October, this is a fundraiser for our local Cancer House, a cause that is very close to my heart. My contribution is a make and take, now I have to admit to feeling challenged by the thought of preparing 100 makes and takes!

Stampin' Up! has very generously agreed to supply over $500.00 worth of retired product for us to auction - how awesome is that! Now I need to step up to the plate with my contribution.

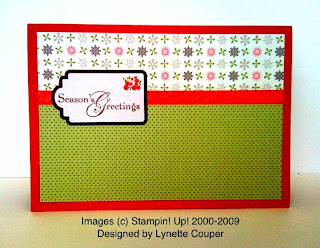
I want people to take home something they like but I need to keep the project simple, after all there will be 100 people wanting to do this and I only have one of most things! This is where Shelli's challenge comes in, it is to make something using only stamps, ink and paper. I have taken this one step further - the dreaded single layer card LOL. I had to remind myself that every layer I added was 100 more items to cut - the thought of a multi layered card scared the living daylights out of me and gave me the boost I needed to get creative.

People need to learn something though, a quick stamp on a piece of cardstock is hardly enlightning in any way. The card I have come up with uses minimal supplies, however I am hoping everyone will leave with a greater understanding of the basic elements we use in cardmaking.

This card uses the fabulous Friends 24/7 set, I have incorporated second generation stamping, sponging, colouring with a blender pen using the lid of a pad and partial stamping of an image.

This is where you, my readers come in. Please tell me that this is suitable, I feel stingy using only 1 sheet of cardstock! (Feel free to let me know if it does appear stingy though).

Stamps: Friends 24/7

Cardstock: Sahara Sand

Ink: Sahara Sand, Basic Brown

Accessories: Blender Pen, Sponge Dauber

Thursday, August 27, 2009

Crazy for Cupcakes

You must be thinking I have forgotten how to make a card with all the 3D items I have been posting lately so here is a card to prove I can still make them.

I have used Regal Rose and Apricot Appeal Designer Paper form the Level 1 Hostess 6x6 Designer Paper Pad, I just love how bright and cheerful this card is.


Stamps: Crazy for Cupcakes

Ink: Basic Black, Brilliant Blue, More Mustard and Real Red

Cardstock: Whisper white, Brilliant Blue, Designer Paper Regal Rose and Apricot Appeal

Accessories: Scallop Edge Punch, Blender Pen

And Another Tissue Box Cover!

I am so hooked on making these! I really should try using another stamp set though LOL. Want to make one too? Click HERE for a tutorial.

Stamps: Forest Friends

Cardstock: Bella Rose Designer Paper, Old Olive, Basic Grey

Ink: Old Olive and Basic Grey

Accessories 5/8" Old Olive Grosgrain Ribbon, 1 1/4" Circle Punch, 1 3/8" Circle Punch, Scallop Circle Punch

Wednesday, August 26, 2009

Tissue Box Cover Tutorial

Well I promised a tutorial on my Tissue Box Cover and here it is! I have designed this so that you can just print directly onto cardstock, to get the PDF file click HERE

Just make sure that your printer is set to print at 100%. I use Sorbent purse pack tissues, the pack measures 10.5cm x 5.5cm x 2.5cm.

Ta Dah - Simple isn't it?

Stamps: Forest Friends

Ink: Really Rust, More Mustard

Cardstock: Certainly Celery, Old Olive and Whisper White

Accessories: Old Olive Marker, Old Olive 5/8" Grosgrain Ribbon, Sticky Strip

Monday, August 17, 2009

Tiny Take Out Box

My husband downloaded some awesome free drawing software that works the way my brain thinks! (It is called SketchUp if you want to try it). I have been having a blast making printable templates for myself.

I have wanted to make an easy Take Out box from a single sheet of cardstock for a while and Sketchup made it so easy to do!

So what do you think? It holds 12 Hershey's kisses and measures about 5cm (2 inches) square not including the top - I think it looks like a fortune cookie when it is twisted up this way.

If enough people are interested I will post a tutorial and a printable template in PDF format for you - hows that for motivation to leave me a comment LOL.

Stamps: None

Cardstock: Old Olive, Haiku Designer Paper, So Saffron Card

Ink: None

Accessories: Cropodile, Rich Regals Brads

Thursday, August 13, 2009

16 to 20 of 20 I Wish Cards

Whew, these are the last of this lot. I haven't even started making the next 20 and it may take me a while. I feel the need to do something else at the moment LOL, I hope you enjoy all these pictures and you don't feel flooded by Christmas . Have a great day and I promise I will post non Christmas stuff soon.

11 to 15 of 20 I Wish Cards

And the next 5 :-)

6 to 10 of 20 I Wish Cards

Here are the next 5, to see the details of what I used please check out this post :-)

1 to 5 of 20 I Wish Cards

OK, I am going to post these in 4 lots of 5, why? Because it is easier for me LOL.

Here are the first 5 of the 20 cards I currently have made, for details of what I used please check out this post

Wednesday, August 12, 2009

20 More I Wish Cards

Here are 20 more cards made from the I Wish Simply Scrappin' kit. I added 5 A4 sheets each of Kraft, Whisper White, Real Red, Old Olive and Chocolate Chip and some 5/8" Real Red grosgrain ribbon to the basic kit, I have made these 20 cards from the add ons and have enough to make another 20, although I am now nearly out of stickers and will need to pull in images from the Snow Swirled Stamp set to make the next 20.

I am hoping to get these cards individually photographed tomorrow and will post them for you to have a closer look.

Stamps: Snow Swirled

Ink: Basic Brown

Card: Kraft, Whisper White, Real Red, Only Olive and Chocolate Chip

Accessories: I Wish Simply Scrappin' Kit, 5/8" Real Red Grosgrain Ribbon,

Saturday, August 1, 2009

I Wish Stationary Box

Well, it is definitly not too early to think about Christmas. I am teaching this fabulous Stationary Box to a wonderful group of ladies tomorrow. It holds 8 standard cards and envelopes, 8 3x3 cards and envelopes, 8 gift tags, a stamp book, an address book and a pen - awesome!

The Stationary Box was designed by the talented Jackie Topa, click here to go to her blog and tutorial. I have made minor alterations to the box to accomodate our cards and stamp books. Cards and envelopes in the US are slightly smaller than ours and I wanted room for 'our' sized cards.

Box Closed

Box Open

Cards

3x3 Cards

Tags

Congratulations if you made it to the end of this marathon post - I nearly didn't LOL! After making all of this I still had one of each of the sticker sheets minus one holly leaf, three sheets of double sided designer paper and one sheet of 12x12 designer paper. So watch out for my next cunning plan - with a few add ons I have challenged myself to make another fourty cards with what I have left.


Stamps: Snow Swirled

Cardstock: I Wish Simply Scrappin' Kit

Ink: Basic Brown

Accessories: Sticky Strip